Canvas basics
The crochet editor canvas is where you view and build your diagram, and learning to pan, zoom, and select stitches on it is the foundation for everything else in the editor.
Panning and zooming
Section titled “Panning and zooming”How you move around the canvas depends on your input mode, which you set in the editor’s settings menu (the gear at the top right) under Input mode:
- Keyboard + Mouse (the default) — the scroll wheel zooms in and out. To pan, hold the Space bar and drag, or drag the scrollbars at the edges of the canvas.
- Trackpad — a two-finger swipe pans, and a pinch zooms.
In either mode, holding Ctrl while you scroll always zooms. Zooming centers on the pointer, so point at the part of the diagram you want to look at before you zoom in.
Modes and tools
Section titled “Modes and tools”The four buttons at the left of the toolbar set what a click or drag on the canvas does:
- Edit (the arrow) — the default. Select and move stitches and drag their handles.
- Place (the +) — place the currently armed stitch or guide by clicking the canvas.
- Chain — move and rotate the chain-ellipse guide.
- Sizing — adjust the size and shape of stitches (covered in Sizing and shaping stitches).
Next to the mode buttons, the Stitch / Guide toggle chooses whether the rail offers stitches or the guides that stitches snap to.
Selecting stitches and handles
Section titled “Selecting stitches and handles”Each stitch has two handles: a base (the filled circle at the bottom) and a top (the hollow ring at the top). Selecting a stitch highlights it and shows these handles.
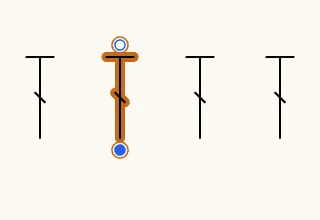
- Select a stitch by dragging a small selection box (a marquee) around it on an empty part of the canvas. Everything inside the box is selected.
- Select just a handle by dragging a marquee around only that end of the stitch — for example, box the top ring to select only the top. This matters when you want to add a stitch on top of another, which needs the top handle in the selection (see Adding stitches).
- Add to a selection by holding Cmd (Ctrl on Windows) while you click or marquee, which toggles items in and out.
Selecting a stitch also opens the inspector on the right, where you can read and change its color, round, order, and links.
Undo, redo, and delete
Section titled “Undo, redo, and delete”Every change you make can be undone. Use the Undo and Redo buttons in the action toolbar down the right edge, or the keyboard:
- Undo — Cmd/Ctrl + Z
- Redo — Cmd/Ctrl + Shift + Z (or Cmd/Ctrl + Y)
- Delete the selection — the Delete or Backspace key (or X)
Keyboard shortcuts
Section titled “Keyboard shortcuts”The full, up-to-date list of shortcuts lives in Settings → Hotkeys. The ones you will reach for most in the crochet editor are:
| Action | Shortcut |
|---|---|
| Save | Cmd/Ctrl + S |
| Pan the canvas | Space + drag / Scroll |
| Zoom | Ctrl + scroll |
| Undo / Redo | Cmd/Ctrl + Z / Cmd/Ctrl + Shift + Z |
| Copy / Paste at pointer | Cmd/Ctrl + C / Cmd/Ctrl + V |
| Duplicate | Cmd/Ctrl + D |
| Delete selection | Delete, Backspace, or X |
| Move selection (grab) | G |
| Switch stitch / guide tools | A |
| Toggle stitch linking | L |
| Toggle snap to grid | Q |
| Confirm a pending action | Enter |
| Cancel the current action | Esc |